Rustic Modern Platform Bed Frame with Headboard (All Bed Sizes)
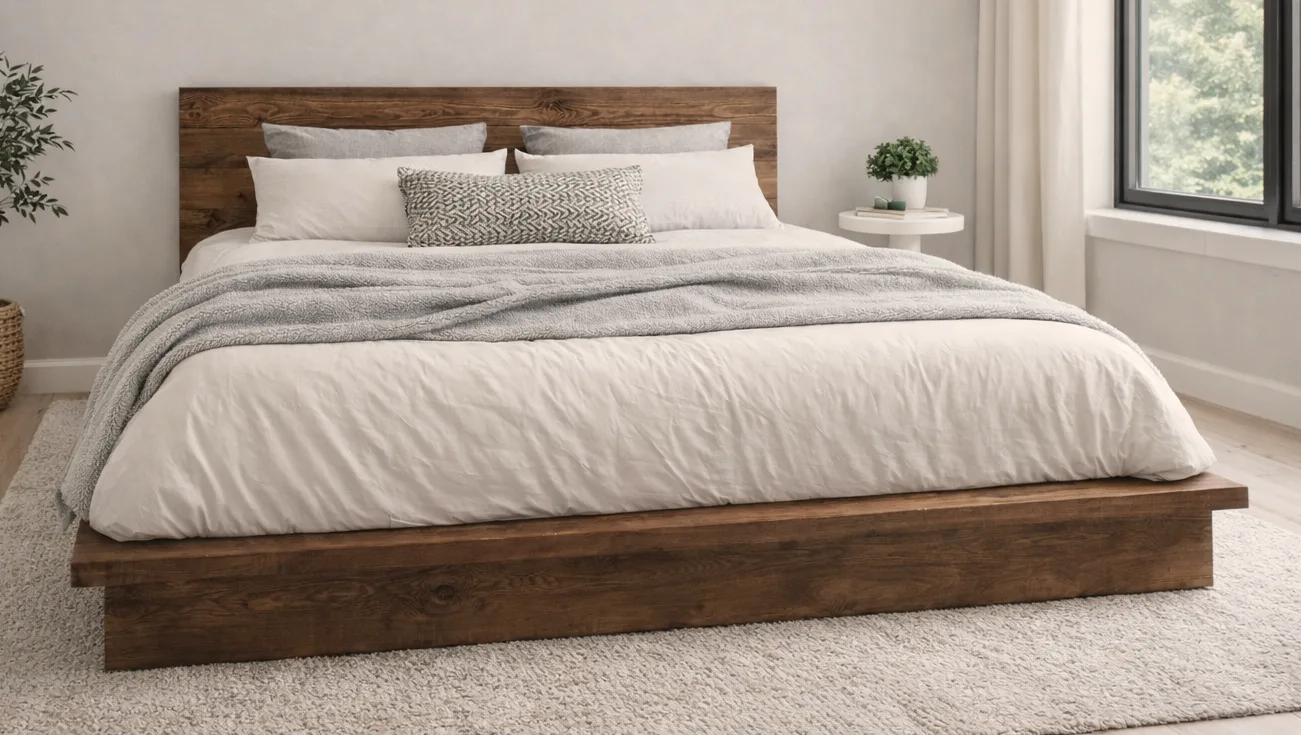
Build Your Own Rustic Modern Platform Bed – Free. Clean, modern lines meet the warmth and charm of solid wood, creating a bed that’s as sturdy and functional as it is beautiful. These free, easy-to-follow plans include: • A complete shopping list • Cut list for efficient use of materials • Detailed step-by-step diagrams • Photos from real builders to inspire and guide you Available for all standard mattress sizes, this platform bed is designed for beginner to intermediate builders. Make it your own with your choice of wood finish and enjoy the satisfaction of custom furniture, built by you.
Dimensions
Use the size-specific shopping and cut lists below.

What you need
- Twin Shopping List - 38x75
- 7 - 1x6 @ 5 feet long or desired length of headboard
- 4 - 2x2 furring strips @ 8 feet long
- 3 - 2x6 @ stud length or 8'
- 3 - 2x4 @ stud length or 8'
- 5 - 1x4 @ 8 feet long
- 1-1/4" brad nails
- 50 - 2-1/2" long self tapping star bit screws
- wood glue
- 120 grit sandpaper
- Full Shopping List - 54x75
- 7 - 1x6 @ 6 feet long or desired length of headboard
- 4 - 2x2 furring strips @ 8 feet long
- 3 - 2x6 @ stud length or 8'
- 4 - 2x4 @ stud length or 8'
- 5 - 1x4 @ 10 feet long (slats)
- 1-1/4" brad nails
- 60 - 2-1/2" long self tapping star bit screws
- wood glue
- 120 grit sandpaper
- Queen Shopping List - 60x80
- 7 - 1x6 @ 8 feet long or desired length of headboard
- 5 - 2x2 furring strips @ 8 feet long
- 3 - 2x6 @ stud length or 8'
- 4 - 2x4 @ stud length or 8'
- 5 - 1x4 @ 10 feet long (slats)
- 1-1/4" brad nails
- 60 - 2-1/2" long self tapping star bit screws
- wood glue
- 120 grit sandpaper
- King (Standard) Shopping List - 76x80
- 7 - 1x6 @ 8 feet long or desired length of headboard
- 5 - 2x2 furring strips @ 8 feet long
- 3 - 2x6 @ stud length or 8'
- 4 - 2x4 @ stud length or 8'
- 10 - 1x4 @ 8 feet long (slats)
- 1-1/4" brad nails
- 60 - 2-1/2" long self tapping star bit screws
- wood glue
- 120 grit sandpaper
- King (California) Shopping List - 72x84
- 7 - 1x6 @ 8 feet long or desired length of headboard
- 5 - 2x2 furring strips @ 8 feet long
- 3 - 2x6 @ stud length or 8'
- 4 - 2x4 @ stud length or 8'
- 11 - 1x4 @ 6 feet long (slats)
- 1-1/4" brad nails
- 60 - 2-1/2" long self tapping star bit screws
- wood glue
- 120 grit sandpaper
- Twin Cut List - 38x75
- HEADBOARD
- 7 - 1x6 @ 60" or desired length of headboard
- 1 - 2x2 @ 60"
- 3 - 2x2 @ 31-1/2"
- SIDERAILS/FOOTBOARD
- 2 - 2x6 @ 75"
- 2 - 2x4 @ 75"
- 1 - 2x6 @ 41"
- 1 - 2x4 @ 45"
- 2- 2x2 @ 75"
- 10 - 1x4 @ 38" (for 4" gaps in between slats - check with your mattress to make sure this is sufficient)
- 2 - 2x4 or 2x6 @ 20" (both ends cut at 45 degrees, long point to long point measurement)
- no center 2x4 needed for twin size
- Full Cut List - 54x75
- HEADBOARD
- 7 - 1x6 @ 72" or desired length of headboard
- 1 - 2x2 @ 72"
- 3 - 2x2 @ 31-1/2"
- SIDERAILS/FOOTBOARD
- 2 - 2x6 @ 75"
- 2 - 2x4 @ 75"
- 1 - 2x6 @ 57"
- 1 - 2x4 @ 61"
- 2- 2x2 @ 75"
- 1 - 2x4 @ 75"
- 10 - 1x4 @ 54" (for 4" gaps in between slats - check with your mattress to make sure this is sufficient)
- 2 - 2x4 or 2x6 @ 20" (both ends cut at 45 degrees, long point to long point measurement)
- Queen Cut List - 60x80
- HEADBOARD
- 7 - 1x6 @ 79" or desired length of headboard
- 1 - 2x2 @ 79"
- 5 - 2x2 @ 31-1/2"
- SIDERAILS/FOOTBOARD
- 2 - 2x6 @ 80"
- 2 - 2x4 @ 80"
- 1 - 2x6 @ 63"
- 1 - 2x4 @ 67"
- 2- 2x2 @ 80"
- 1 - 2x4 @ 80"
- 11 - 1x4 @ 60" (for 4" gaps in between slats - check with your mattress to make sure this is sufficient)
- 2 - 2x4 or 2x6 @ 20" (both ends cut at 45 degrees, long point to long point measurement)
- King (Standard) Cut List - 76x80
- HEADBOARD
- 7 - 1x6 @ 96" or desired length of headboard
- 1 - 2x2 @ 96"
- 6 - 2x2 @ 31-1/2"
- SIDERAILS/FOOTBOARD
- 2 - 2x6 @ 80"
- 2 - 2x4 @ 80"
- 1 - 2x6 @ 79"
- 1 - 2x4 @ 83"
- 2- 2x2 @ 80"
- 1 - 2x4 @ 80"
- 11 - 1x4 @ 76" (for 4" gaps in between slats - check with your mattress to make sure this is sufficient)
- 2 - 2x4 or 2x6 @ 20" (both ends cut at 45 degrees, long point to long point measurement)
- King (California) Cut List - 72x84
- HEADBOARD
- 7 - 1x6 @ 96" or desired length of headboard
- 1 - 2x2 @ 96"
- 6 - 2x2 @ 31-1/2"
- SIDERAILS/FOOTBOARD
- 2 - 2x6 @ 84"
- 2 - 2x4 @ 84"
- 1 - 2x6 @ 75"
- 1 - 2x4 @ 79"
- 2- 2x2 @ 84"
- 1 - 2x4 @ 84"
- 11 - 1x4 @ 72" (for 4" gaps in between slats - check with your mattress to make sure this is sufficient)
- 2 - 2x4 or 2x6 @ 20" (both ends cut at 45 degrees, long point to long point measurement)
SLAT SYSTEM
SLAT SYSTEM
SLAT SYSTEM
SLAT SYSTEM
SLAT SYSTEM
- measuring tape
- pencil
- safety glasses
- drill
- compound miter saw
- sander
Step by step
Headboard
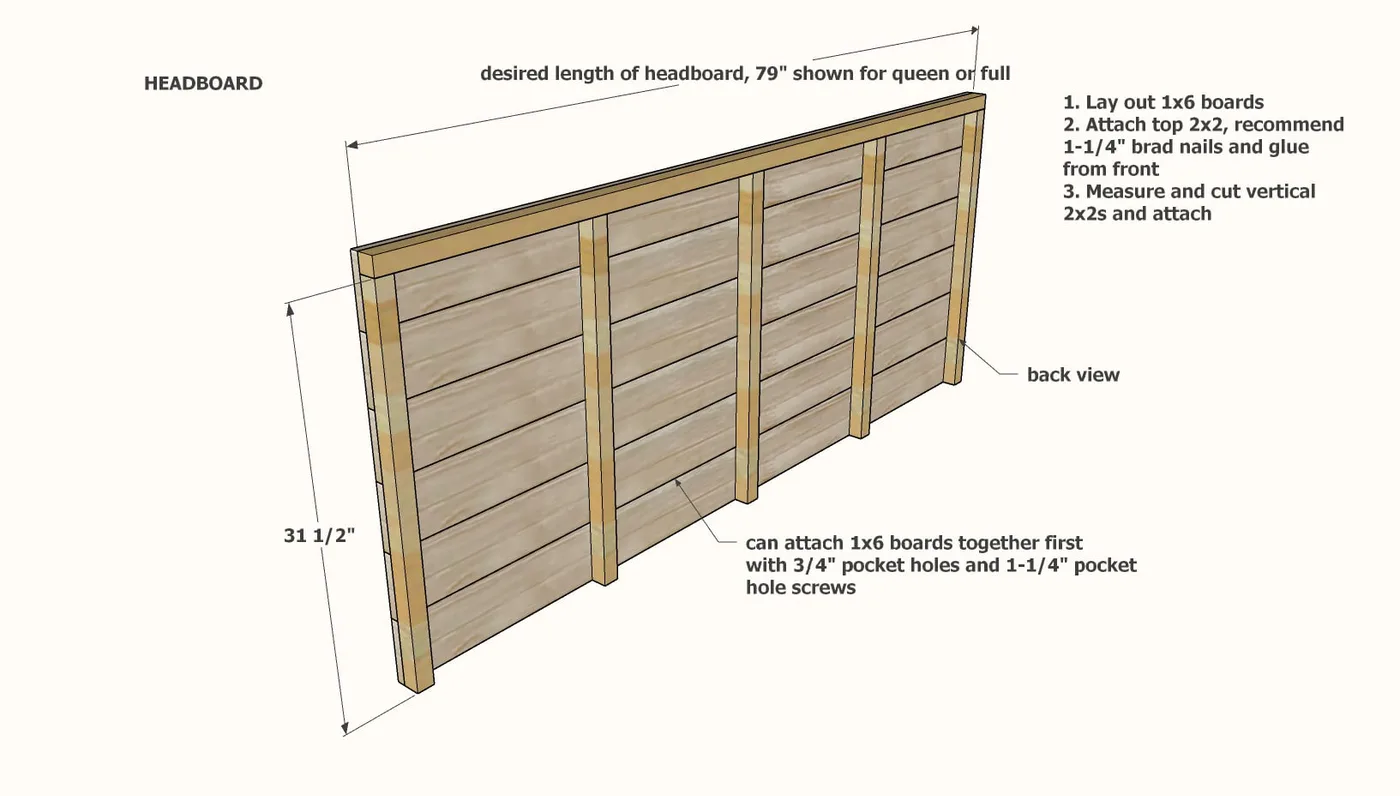
Headboard can be easily modified in size by just extending the length of the 1x6s, or by adding more rows of 1x6 boards. Cut the 1x6s with a compound miter saw or chop saw. Lay out the 1x6 boards on a flat level surface. Attach the top 2x2 to the top. Attach the vertical supports on ends, and then spaced out. Prefinish the headboard.
Siderails and Footboard
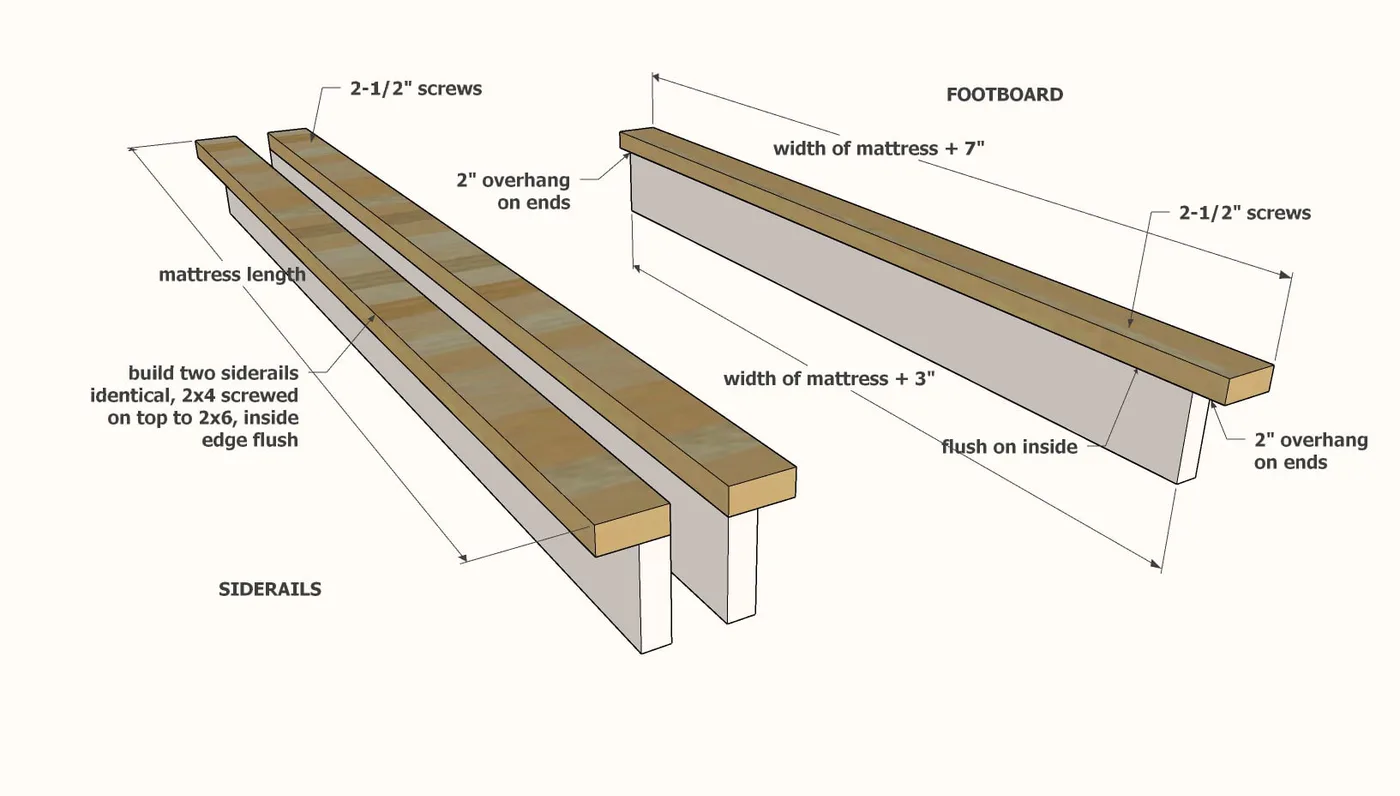
Attach the 2x4s on top of the 2x6s to create the siderails and footboard. All edges are flush to the insides. Footboard 2x4 overextends the 2x6 by 2" on each end. Prefinish the siderails and footboard.
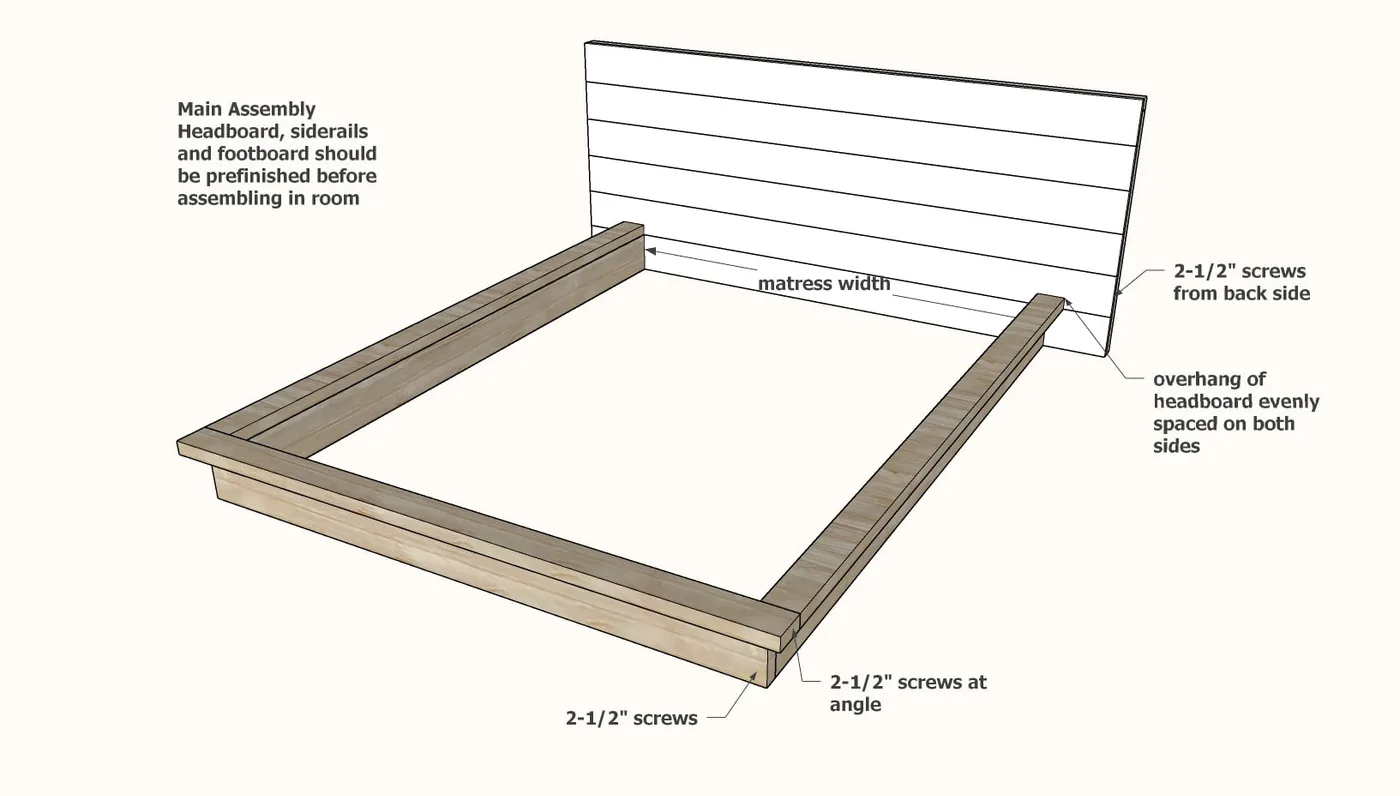
In the room, use the long screws to attach the footboard to the siderails.
Then attach the siderails to the headboard and set in place.
Step 4
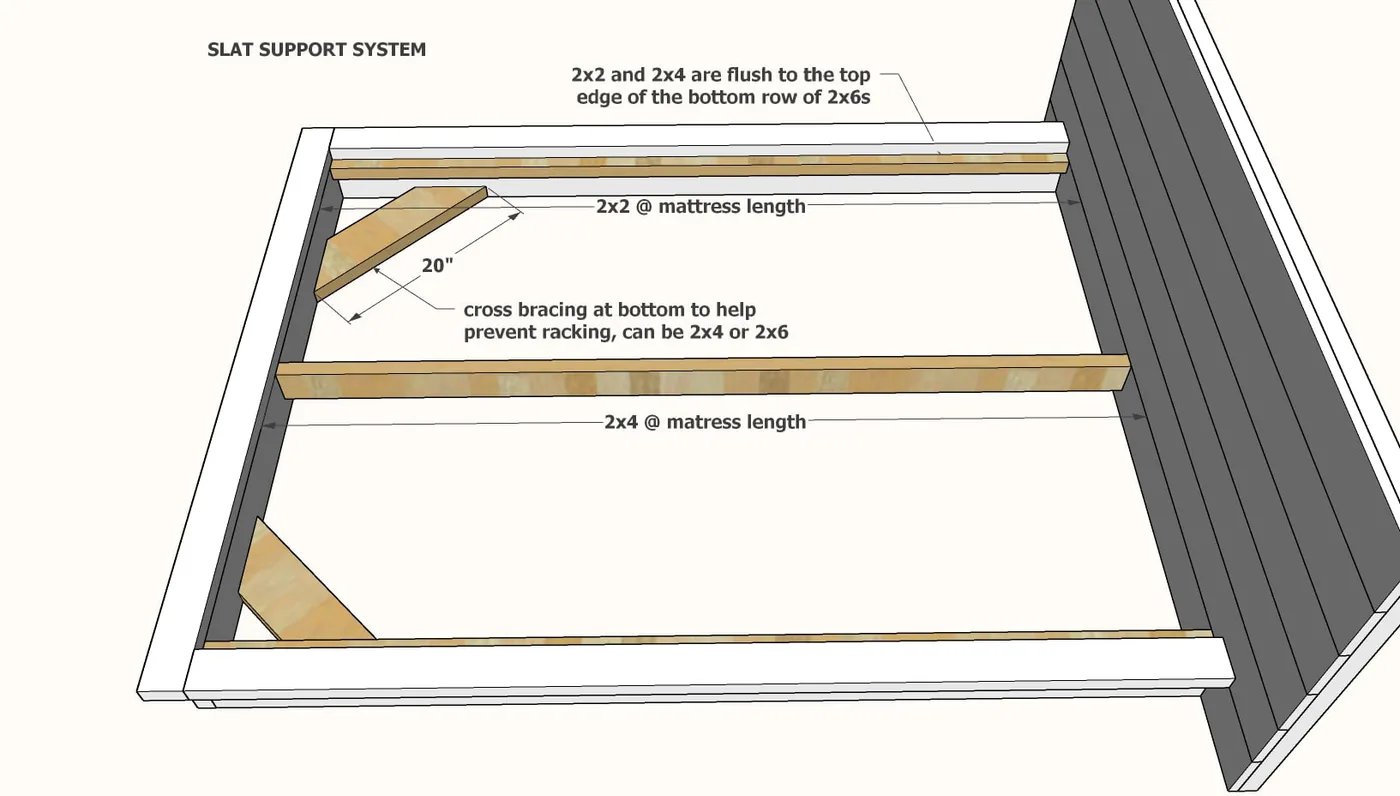
To keep the bed from racking, attach the 45 degree cross bracing at the bottom. You can also attach at the headboard for additional support. Then add the 2x2 cleats. For full size or larger, add the center 2x4 support, so the top edge is at the same height as the top edge of the 2x2s. For additional support, center "legs" can be screwed to the center 2x4 to support the center of the bed.
Step 5
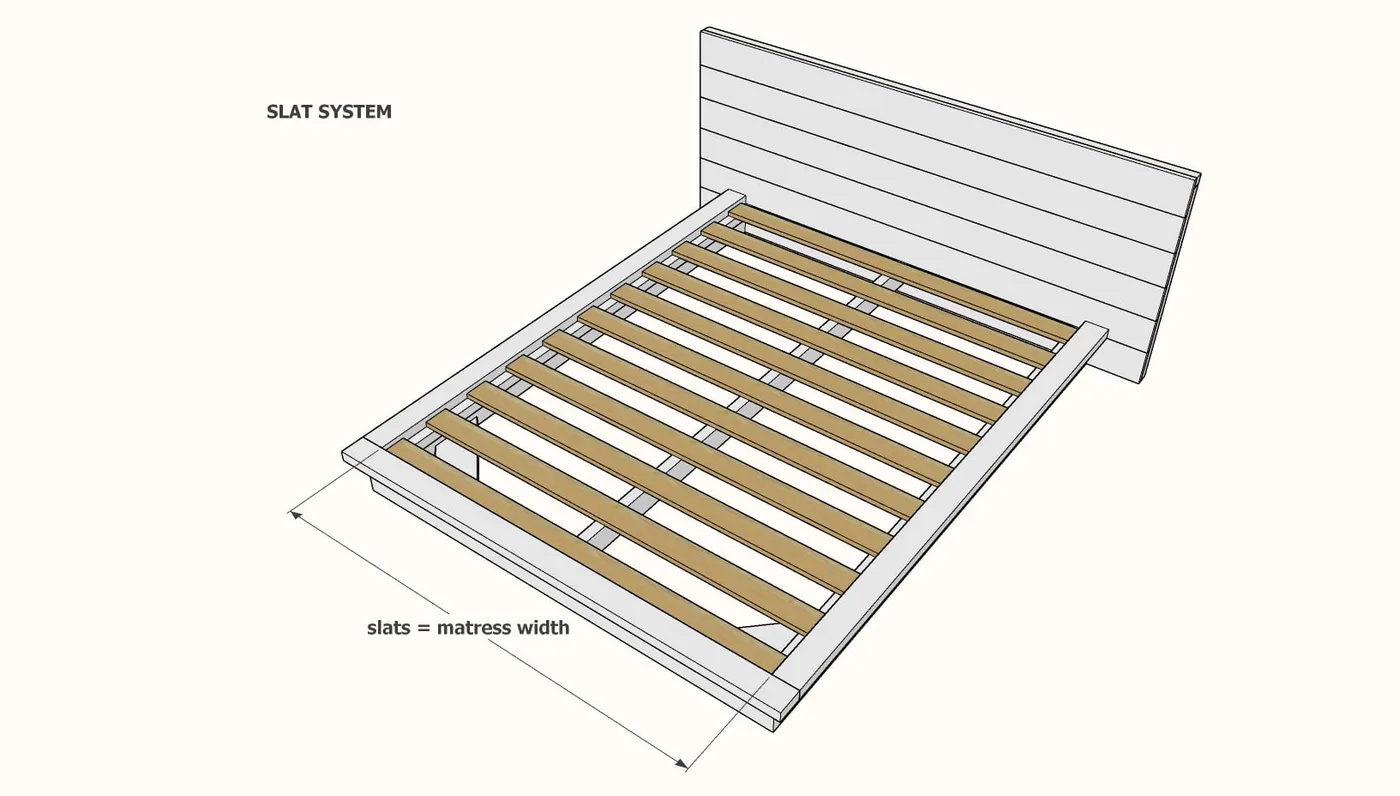
Layout the slats on the cleats, spacing about 4" apart. Use the 1-1/4" nails to tack down.
Finishing
Sand all surfaces, starting with a medium grit and finishing with fine. Wipe off the dust, fill any holes or gaps with wood filler, and sand smooth once dry. Apply primer if you're painting, then finish with your choice of paint or stain and seal with a durable clear topcoat. For outdoor projects, use exterior-rated primer, paint or stain, and sealer so the piece stands up to the weather.