Modern Platform Bed Frame
Build your own modern platform bed frame with! Featuring clean lines, a sturdy wood design, and a simple beginner-friendly build process, this bed frame is available in Twin, Full, Queen, King, and California King sizes. Perfect for a modern, minimalist bedroom with plenty of room for customization with your favorite stain, paint, or headboard. HEADBOARD PLANS - The headboard is also DIY and the plans are free here.

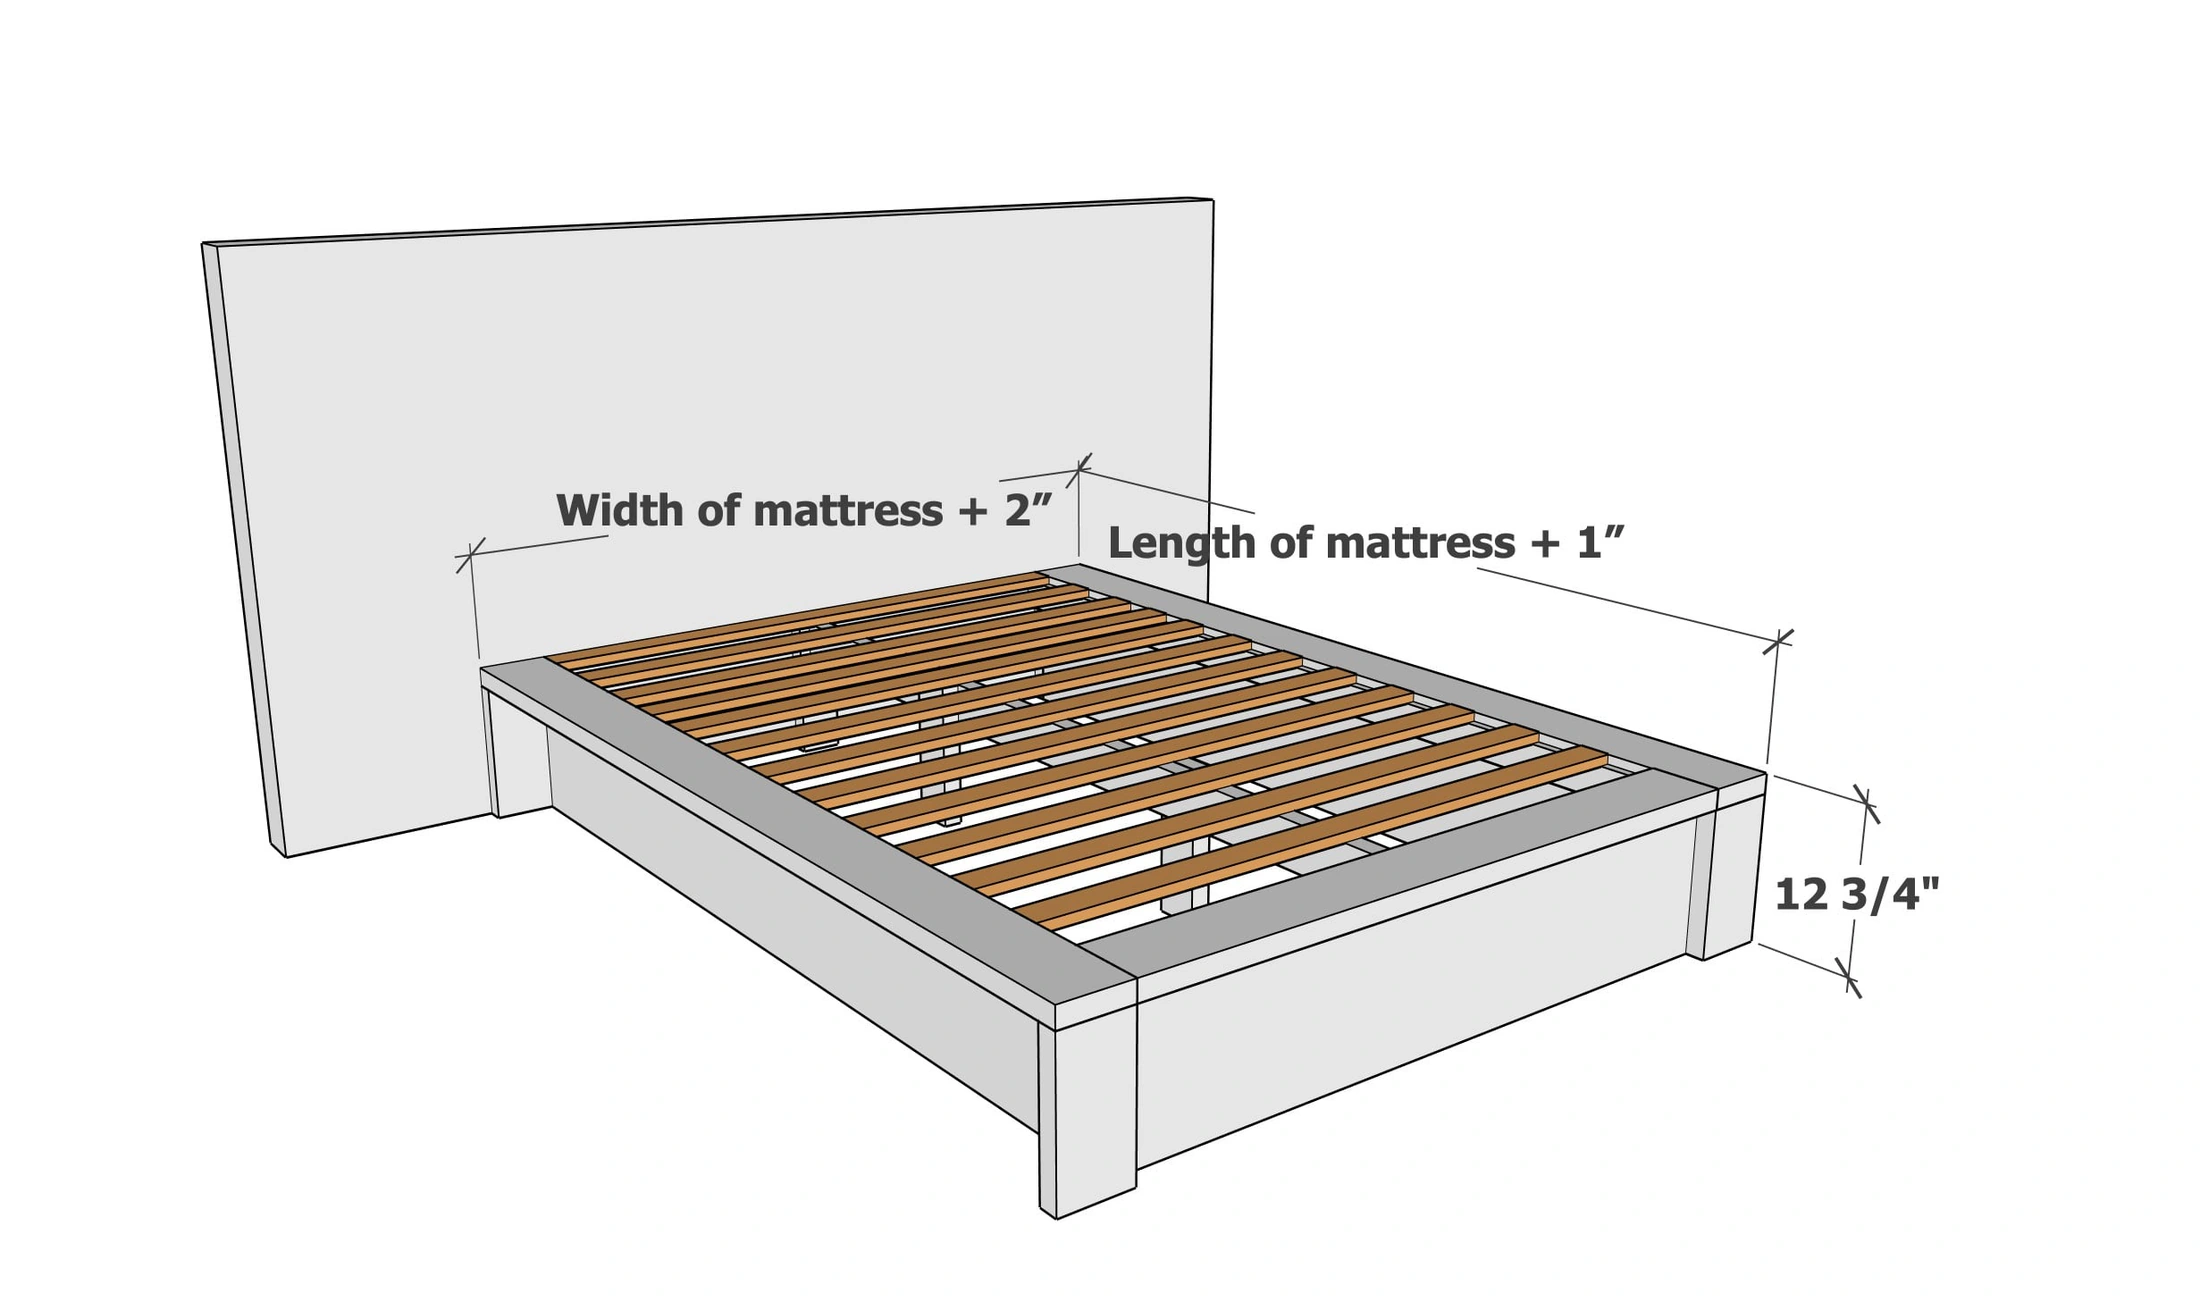
Dimensions
Use the size-specific shopping and cut lists below.
What you need
- 3 – 2x6 Boards, 8' long
- 1 – 1x12 Board, 8' long
- 1 – 1x12 Board, 10' long
- 6 – 1x3 Furring Strips, 8' long
- 1 Box – 1-1/4" Pocket Hole Screws
- 1 Box – 2-3/4" Self Tapping Star Bit Wood Screws
- 120 Grit Sandpaper
- Wood Stain or Paint
- 3 – 2x6 Boards, 8' long
- 2 – 1x12 Boards, 8' long
- 1 – 1x12 Board, 12' long
- 8 – 1x3 Furring Strips, 8' long
- 2 – 2x4 Boards, 8' long
- 1 Box – 1-1/4" Pocket Hole Screws
- 1 Box – 2-3/4" Self Tapping Star Bit Wood Screws
- 120 Grit Sandpaper
- Wood Stain or Paint
- 3 – 2x6 Boards, 8' long
- 3 – 1x12 Boards, 8' long
- 14 – 1x3 Furring Strips, 8' long
- 2 – 2x4 Boards, 8' long
- 1 Box – 1-1/4" Pocket Hole Screws
- 1 Box – 2-3/4" Self Tapping Star Bit Wood Screws
- 120 Grit Sandpaper
- Wood Stain or Paint
- 3 – 2x6 Boards, 8' long
- 3 – 1x12 Boards, 8' long
- 14 – 1x3 Furring Strips, 8' long
- 2 – 2x4 Boards, 8' long
- 1 Box – 1-1/4" Pocket Hole Screws
- 1 Box – 2-3/4" Self Tapping Star Bit Wood Screws
- 120 Grit Sandpaper
- Wood Stain or Paint
- 3 – 2x6 Boards, 10' long
- 3 – 1x12 Boards, 8' long
- 15 – 1x3 Furring Strips, 10' long
- 2 – 2x4 Boards, 10' long
- 1 Box – 1-1/4" Pocket Hole Screws
- 1 Box – 2-3/4" Self Tapping Star Bit Wood Screws
- 120 Grit Sandpaper
- Wood Stain or Paint
Twin Mattress Shopping List - Twin does not need center support system
Full Mattress Shopping List
Queen Mattress Shopping List
King Mattress Shopping List
California King Mattress Shopping List
- SIDERAILS
- 4 - 2x6 @ 11-1/4"
- 2 - 2x6 @ length of mattress PLUS 1"
- 2 - 1x12 @ length of mattress MINUS 2"
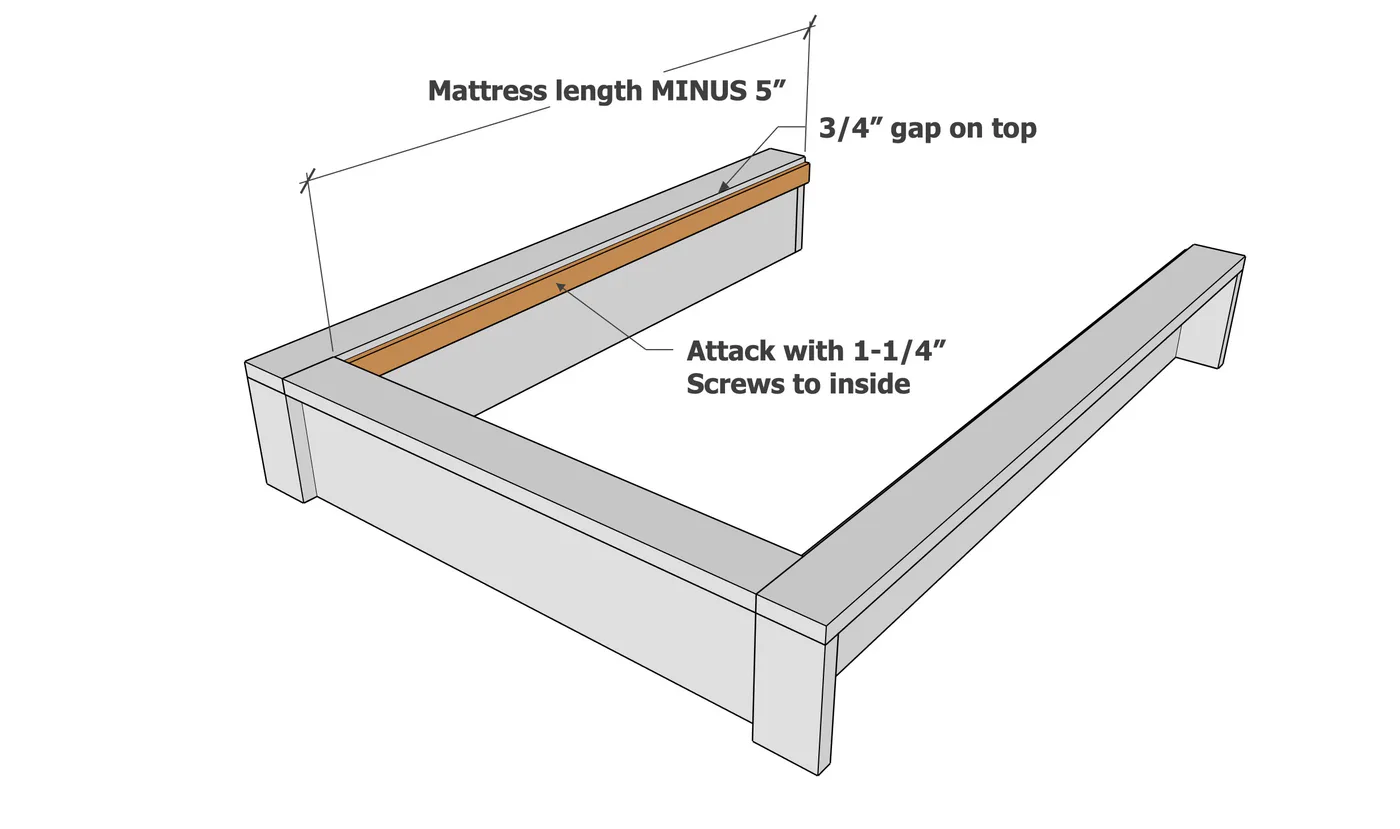
- 2 - 1x3 @ length of mattress MINUS 5" - cleats
- FOOTBOARD
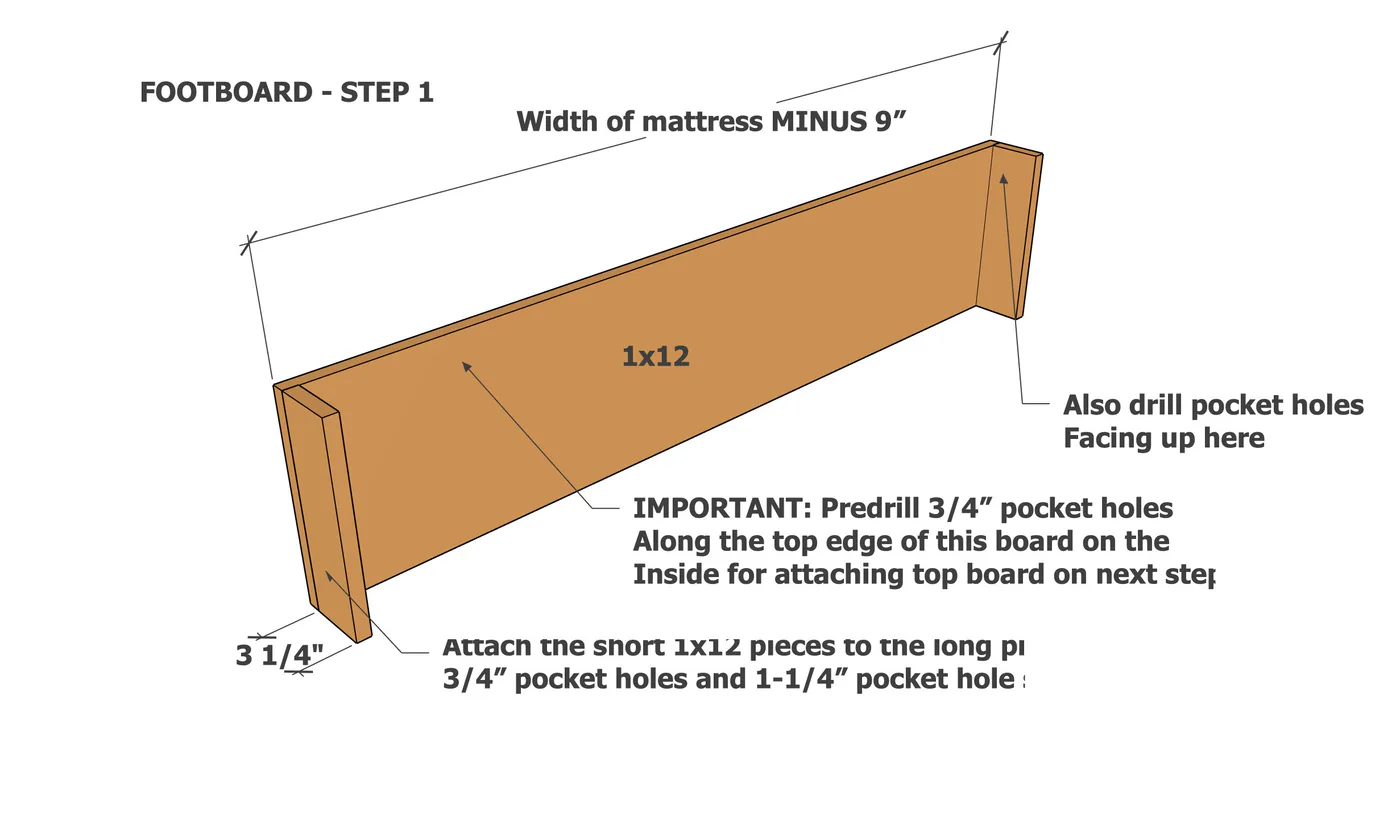
- 1 - 1x12 @ width of mattress MINUS 9"
- 2 - 1x12 @ 3-1/4"
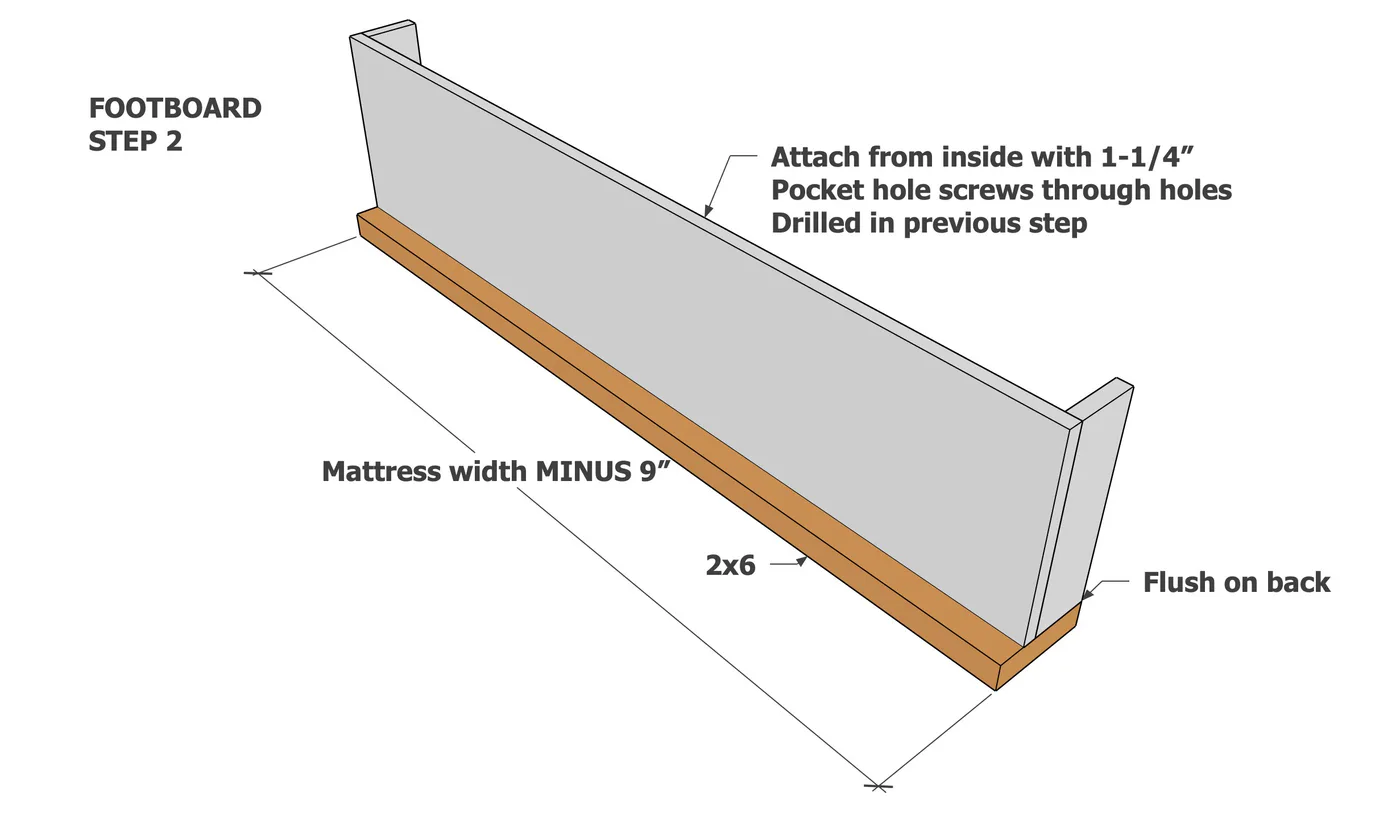
- 1 - 2x6 @ width of mattress MINUS 9"
- 1 - 2x4 @ length of mattress MINUS 2-3/4" (notch out end 3/4" x 3-1/2")
- 3 - 2x4 @ 12"
- 12 - 1x3 @ width of mattress MINUS 9"
- SIDERAILS
- 4 – 2x6 @ 11-1/4"
- 2 – 2x6 @ 76"
- 2 – 1x12 @ 73"
- 2 – 1x3 @ 70" (cleats)
- FOOTBOARD
- 1 – 1x12 @ 29"
- 2 – 1x12 @ 3-1/4"
- 1 – 2x6 @ 29"
- 10 – 1x3 @ 29"
- Full Mattress (54" x 75")
- SIDERAILS
- 4 – 2x6 @ 11-1/4"
- 2 – 2x6 @ 76"
- 2 – 1x12 @ 73"
- 2 – 1x3 @ 70" (cleats)
- FOOTBOARD
- 1 – 1x12 @ 45"
- 2 – 1x12 @ 3-1/4"
- 1 – 2x6 @ 45"
- 1 – 2x4 @ 72-1/4"
- 3 – 2x4 @ 12"
- 10 – 1x3 @ 45"
- Queen Mattress (60" x 80")
- SIDERAILS
- 4 – 2x6 @ 11-1/4"
- 2 – 2x6 @ 81"
- 2 – 1x12 @ 78"
- 2 – 1x3 @ 75" (cleats)
- FOOTBOARD
- 1 – 1x12 @ 51"
- 2 – 1x12 @ 3-1/4"
- 1 – 2x6 @ 51"
- 1 – 2x4 @ 77-1/4"
- 3 – 2x4 @ 12"
- 12 – 1x3 @ 51"
- King Mattress (76" x 80")
- SIDERAILS
- 4 – 2x6 @ 11-1/4"
- 2 – 2x6 @ 81"
- 2 – 1x12 @ 78"
- 2 – 1x3 @ 75" (cleats)
- FOOTBOARD
- 1 – 1x12 @ 67"
- 2 – 1x12 @ 3-1/4"
- 1 – 2x6 @ 67"
- 1 – 2x4 @ 77-1/4"
- 3 – 2x4 @ 12"
- 12 – 1x3 @ 67"
- California King Mattress (72" x 84")
- SIDERAILS
- 4 – 2x6 @ 11-1/4"
- 2 – 2x6 @ 85"
- 2 – 1x12 @ 82"
- 2 – 1x3 @ 79" (cleats)
- FOOTBOARD
- 1 – 1x12 @ 63"
- 2 – 1x12 @ 3-1/4"
- 1 – 2x6 @ 63"
- 1 – 2x4 @ 81-1/4"
- 3 – 2x4 @ 12"
- 12 – 1x3 @ 63"
INNER SUPPORT/CLEATS
Twin Mattress (38" x 75") - Twin does not need center support system
INNER SUPPORT / CLEATS
INNER SUPPORT / CLEATS
INNER SUPPORT / CLEATS
INNER SUPPORT / CLEATS
INNER SUPPORT / CLEATS
- measuring tape
- square
- pencil
- safety glasses
- kreg-jig
- drill
- circular saw
- sander
Step by step
Step 1

Step 2

Step 3
Step 4
Step 5

Step 6
Step 7

Step 8

Step 9
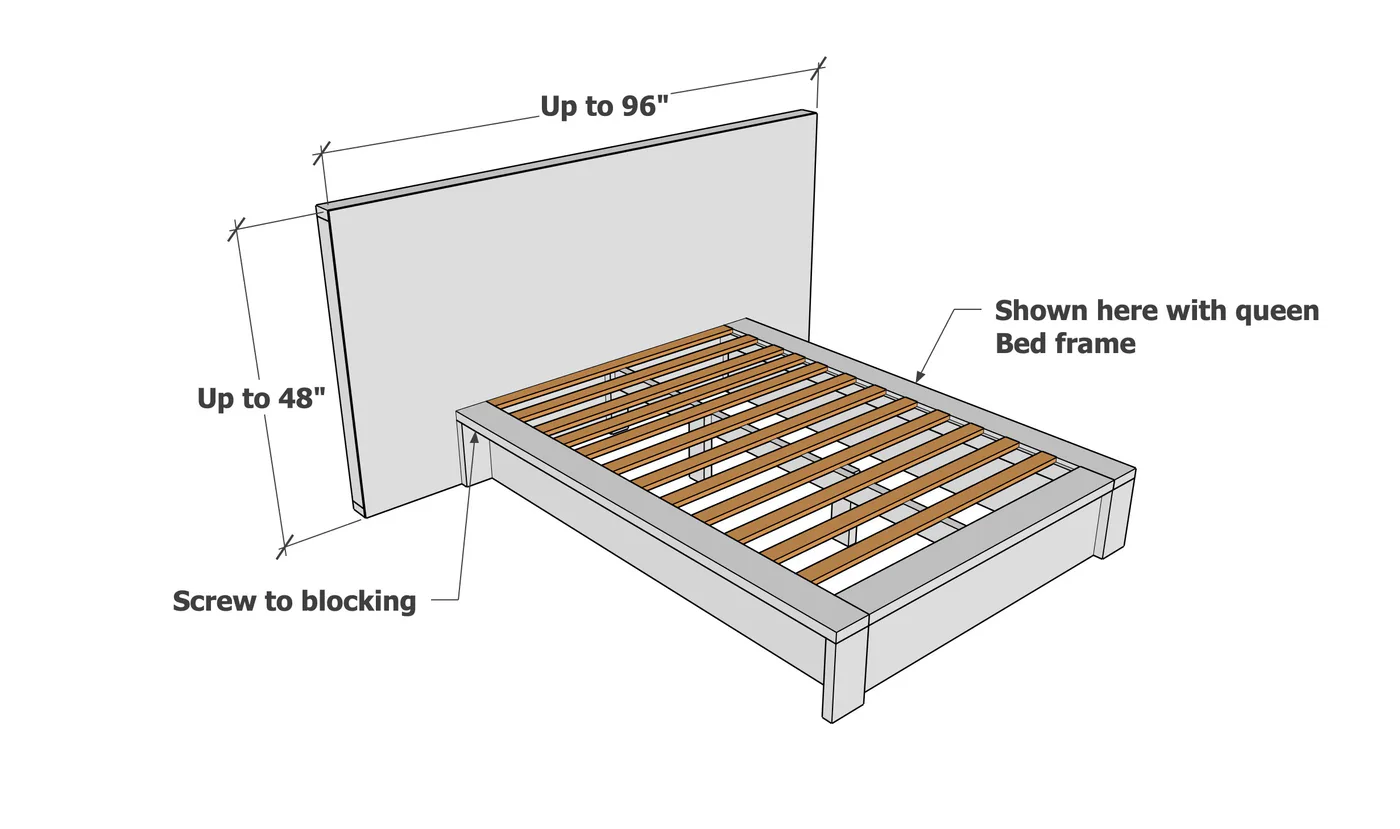
The headboard is also DIY. The are here.
Finishing
Sand all surfaces, starting with a medium grit and finishing with fine. Wipe off the dust, fill any holes or gaps with wood filler, and sand smooth once dry. Apply primer if you're painting, then finish with your choice of paint or stain and seal with a durable clear topcoat. For outdoor projects, use exterior-rated primer, paint or stain, and sealer so the piece stands up to the weather.