X Book Caddy
to build a Land of Nod Good Read inspired book caddy. Your kids will love putting their books away at just their height at an angle. DIY tutorial.

Dimensions
Use the size-specific shopping and cut lists below.

What you need
- 2 - 1x2 @ 8'
- 1 - 1x3 @ 4'
- 1 - 1x4 @ 4'
- 1 - 1x6 @ 4'
Recommended attachment is 3/4" pocket holes and 1 1/4" pocket hole screws
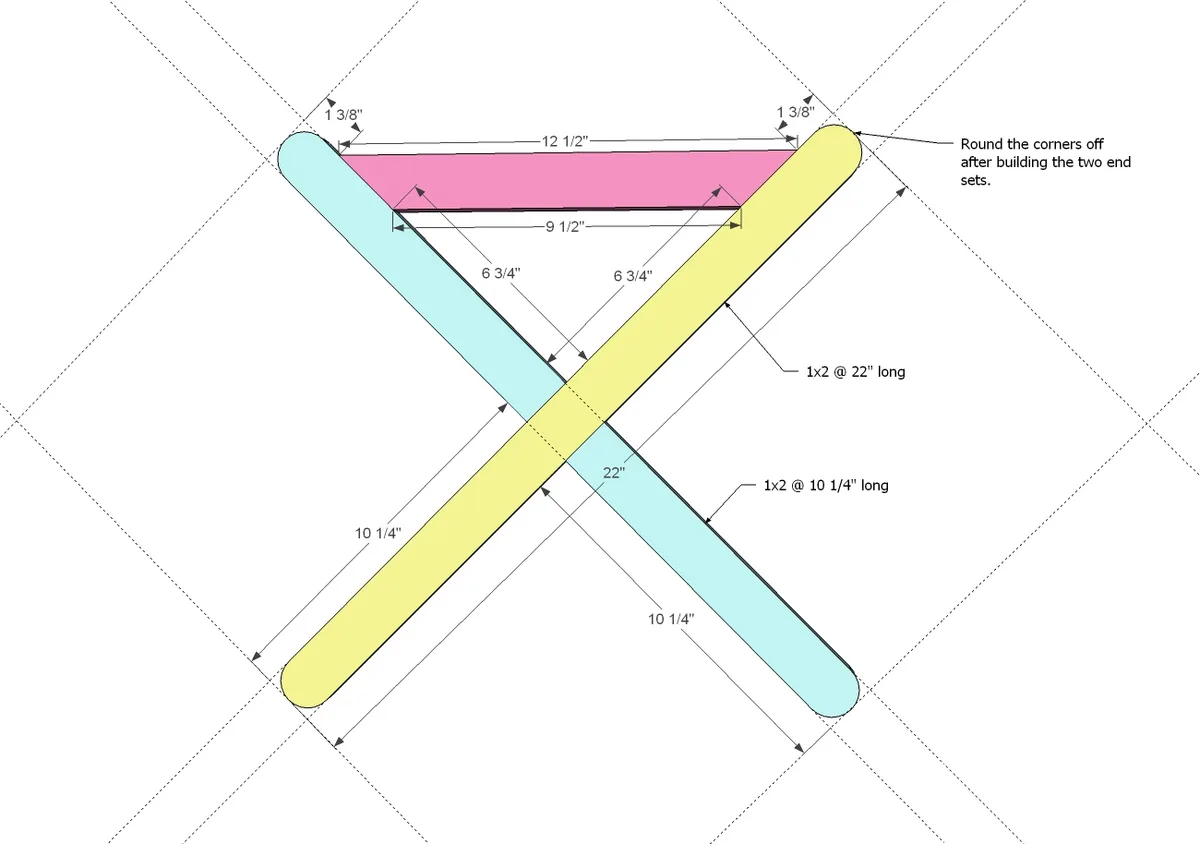
- 2 - 1x2 @ 22"
- 4 - 1x2 @ 10 1/4"
- 2 - 1x2 @ 12 1/2" (both ends cut at 45 degrees off square not parallel)
- 2 - 1x2 @ 14 3/4" (both ends cut at 45 degrees off square not parallel)
- 2 - 1x6 @ 24" (bottom shelf)
- 2 - 1x4 @ 24" (top shelf bottom slat)
- 2 - 1x3 @ 24" (top shelf middle slat)
- 2 - 1x2 @ 24" (top shelf top slat)
- measuring tape
- square
- pencil
- safety glasses
- hearing protection
- kreg-jig
- drill
- jigsaw
- compound miter saw
- sander
Step by step
Don't round the corners at the top and bottom ends yet - it'll be easier to do that last.
The easiest way to join these board is with a single 3/4" pocket hole and 1 1/4" pocket hole screw - use glue. Make sure the two ends match up.
Step 2
Now attach the bottom support to the bottom - remember to put these on the insides. I'd use 1 1/4" finish nails and glue or countersunk screws.

Step 3
Attach bottom shelf boards to bottom rungs. Again, I'd use the 1 1/4" screws or finish nails and glue.

These can be either attached with pocket holes or countersunk screws and glue.
Once these guys are on, you can have at it with the jigsaw and round those top corners off.

Finishing
Sand all surfaces, starting with a medium grit and finishing with fine. Wipe off the dust, fill any holes or gaps with wood filler, and sand smooth once dry. Apply primer if you're painting, then finish with your choice of paint or stain and seal with a durable clear topcoat. For outdoor projects, use exterior-rated primer, paint or stain, and sealer so the piece stands up to the weather.