Kitchen Cabinet Configurator and Building Guide
This post is sponsored by Kreg Tool. Without Kreg, professional looking cabinetry with minimal tools would be next to impossible. Thanks Kreg! Build Custom Frameless Kitchen Cabinets — Step-by-Step Guide & Plans Over the last 20 years of building projects, we've tackled at least a dozen kitchens, each with many various cabinets. With each kitchen….

What you need
- Supplies Needed to Build Kitchen Cabinets
- Carcass
- 3/4" plywood, cabinet grade - estimate two base cabinets (depending on size) per sheet of plywood
- 1x3 or 1x4 boards for bay supports, or can use plywood scraps
- 1-1/4" pocket hole screws (about 30 per cabinet)
- Drawers
- 1x boards for drawer boxes (1x3 or 1x4s work good for top drawers, 1x8s for larger drawers)
- 22" white bottom corner mount drawer slides
- 1/4"hardwood plywood for drawer bottoms
- 1-1/4" and 3/4" brad nails
- Drawer Faces (hardwood 1x boards, cut to size)
- 1-1/4" screws for attaching drawer faces from inside
- Shaker Doors
- 1x3 hardwood for shaker doors
- 1/4" plywood panels for center of shaker door
- 1-1/4" pocket hole screws
- Tools I Used
- Tape measure
- Safety Glasses
- Speed square (marking, marking toekicks)
- Drill
- Circular Saw
- Kreg Rip Cut (ripping plywood with circular saw)
- Jigsaw (for cutting toekicks)
- Iron (for edge banding)
- Edge banding trimmer (for edge banding)
- Kreg Pocket Hole Jig (Building Carcass)
- Brad Nailer (for building drawer boxes)
- Palm Sander
- Level (for installing drawer slides)
- Forstner Bit (for boring holes for hinges)
- Clamps
Edge banding (about 10 feet per cabinet, depending on width of cabinet and number of shelves)
optional - 1/4" plywood for back of cabinet carcass
Handheld router with slot cutter for routing out the groove
Frameless Concealed Hinge Full Overlay (2 per standard door, 3-4 for larger door) and Forstner Bit for installing
Kreg Accu Cut (cross cutting plywood with circular saw)
Flush cut edge banding length cutter (for edge banding)
Palm Router with slot cutter bit (for cutting groove in shaker door frames)
Step by step
Design Your Kitchen Cabinets
You'll need a cut list per each kitchen cabinet. Use the free design app at the top of this webpage, input your desired kitchen cabinet dimensions and screenshot the cut list and print.
Break Down Your Plywood
Next step is to break down your plywood. You'll want to use 3/4" thick hardwood plywood for the carcasses and a saw with lots of teeth, designed for fine cuts, so you don't get splintering cuts. First, rip the entire length of the plywood, using either a tablesaw or a guide. I very much like the Kreg Rip Cut as it works with any circular saw, and allows you to move the tool, not the plywood (so you can break down the entire sheet without moving the plywood). It is VERY important that your rip cuts are consistent and straight, so you can apply edge banding in later steps. After ripping, cross cut the pieces into the required sizes calculated in the design app. The pieces must be very precise.
Cut Toekicks in Base Cabinets
For all side panels that need toekicks, carefully cut out with a jigsaw with a blade for plywood cutting. I use a jigsaw here. If you do a lot of toe kicks, make up a jig that you can clamp to your plywood and your jigsaw foot would follow the jig.
Frameless Cabinets - Edge Banding to Front Edges of Plywood Pieces
The next step is edge banding for frameless cabinets. For frameless cabinets, front edges must be edge banded. Here is a video of how to do edge banding. Face Frame - Add 1x2 Trim to the Front If you are building face frame cabinets, you do not need to apply edge banding. Instead, build a face frame for the front of your cabinets using 1x2s. Pocket hole the face frame together with 3/4" pocket holes and 1-1/4" pocket hole screws. Then attach to the front with 1-1/4" brad nails and wood glue. Most cabinets will have doors hiding the face frames, so exposed nail holes shouldn't be a big issue. If it is, you can attach the face frames using pocket holes.
Carcass Assembly
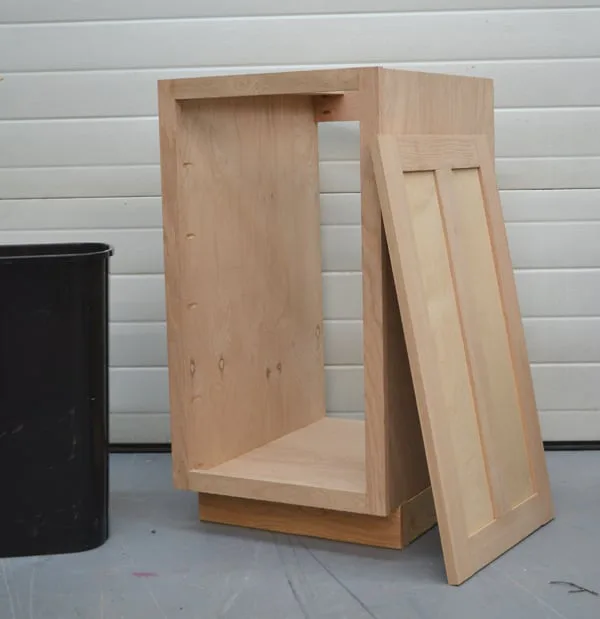
Once your plywood pieces are all prepped (cut to size, toekicks, edgebanding), it's time for assembly. I recommend 3/4" pocket holes drilled on the bottom of the shelves, to attach to the sides with 1-1/4" pocket hole screws. The bottoms need to be placed right above the toekick, straight all the way back. It is very important to make sure the front edges are all flush. Here is a video with tips for Pocket Holes: Back - if you'd like to add a back, the easiest ways 1/4" plywood. On assembly, you'll need to add trim to cover the exposed plywood edges where applicable.
Bay Supports
The tops of the cabinets will not have a 3/4" plywood top - this would make the cabinet heavy and create extra expense. Instead, use 1x3 or 1x4 or scrap 3/4" plywood strips to add bay supports to the top, behind the toekick, and at the bottom back. I recommend two bays supports at the top, and two at the back. Attach bay supports with 3/4" pocket holes and 1-1/4" pocket hole screws. The bay supports also give you a screw area, for attaching the cabinets to the wall or installing countertops in later steps. Bay supports should be added between drawer faces, if adding drawer faces.
Adding Drawers
The drawer slides I like are roller drawer slides. These slide great, are easy to install, support the plywood bottom of a drawer box, and are readily available end inexpensive. Drawer boxes should be built with the sides the same length as your drawer slides. The front and back of the drawer box should be 2-1/2" less than the overall opening width. The plywood bottom is the 1" less in width and equal in length to the drawer slide length. Drawer boxes can be built with 1-1/4" brad nails and glue. Drawer bottoms attached with 3/4" brad nails and glue. I use 3/4" thick drawer material, leaving lots of headroom for the drawer box, so you can place it in the cabinet. Here's a video on how to build drawer boxes and install the drawer slides.
Building Doors
You may opt to buy cabinet doors, or build your own. The steps I take to build doors is to make a 1x3 frame first and pocket hole it together. Then I router out a grove for the plywood panel using a slot cutter and a handheld router. Then I take the door apart on one side, so the plywood panel can slide in. Next, I cut the plywood panel and fit it in. The corners need to be trimmed on the panel, because the router only cuts at a radius in the corners. Then, reattach the 1x3s back together to finish the doors. I use a hardwood with straight grains for the doors, as they will warp over time if you don't. Doors are a little more involved, so much I made them a skill in my 12 Skills to Build Your Own Furniture ebook.
Finishing
At this point, with the doors and carcasses finished, it's a good time to apply a paint finish or stain. Use a high quality cabinet paint, apply with a foam roller. You'll need a brush or foam applicator to get the inside corners. Apply in several light coats, very carefully, so there are no drips or brush marks. Make sure the paint fully cures before handling.
Installing Doors
I only use concealed hinges, as these are highly adjustable, smooth operating, and don't need a closing magnet or catch. Here is a full tutorial and video on how to install doors the easy way.
Finishing
Sand all surfaces, starting with a medium grit and finishing with fine. Wipe off the dust, fill any holes or gaps with wood filler, and sand smooth once dry. Apply primer if you're painting, then finish with your choice of paint or stain and seal with a durable clear topcoat. For outdoor projects, use exterior-rated primer, paint or stain, and sealer so the piece stands up to the weather.